
The first group of photos is a simple way to help you understand depth of field and how much more creative you can be if you shoot in Manual or AV modes:

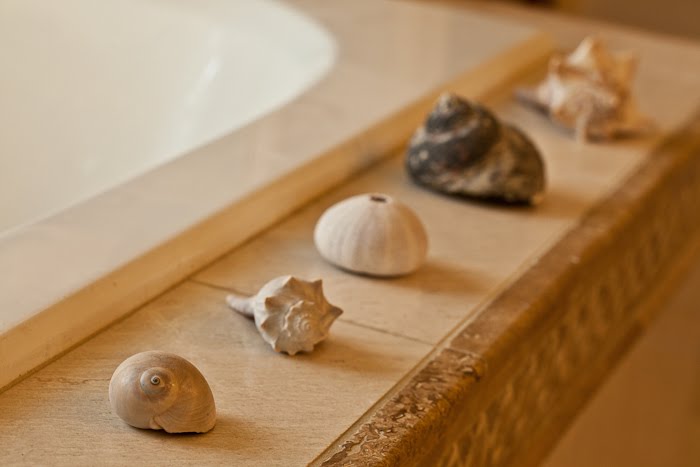
Program Mode - camera chose Aperture f/3.5 Shutter 1/125
On all these images I focused on the first shell. When I let the camera do the thinking, it decided that I wanted only one shell in focus and everything else blurry, so that's what it did. That's o.k. if that's what I really wanted. But what if I wanted to see more of the other shells?
 AV Mode - Aperture f/8 Shutter 1/20
I changed from Program to AV mode. I knew that if I chose a small aperture number, the back shells would still be blurry, so I picked a larger number and then the camera set the appropriate shutter speed to make a correct exposure. Hmmm, the shells are clearer and I like this better, but I was really hoping to see all the shells clearly. (As a side note, what do you notice about the shutter speed the camera selected?? It's pretty slow. I'd have to have a really steady hand to hold still long enough so the image wouldn't be blurry. Best option would be to use a tripod, which I did.)
 AV Mode - Aperture f/32 Shutter 1/0.8
Now I turned the aperture wheel to the largest number I could, to get the greatest depth of field I could. Remember the bigger the aperture number, the smaller the hole to allow light in. In order to get enough light through that small hole for a proper exposure, the shutter has to stay open a long time - a slow shutter speed. The shutter stays open so long, that I absolutely must use a tripod. Now this is what I envisioned when I set up this shot. Can you see that I couldn't achieve what I wanted if I'd just shot in Auto??
(For those pros out there who are worrying that I haven't talked about all the other factors that affect DOF such as what type of lens I was using, how close to the shells did I placed my camera, did I consider hyperfocal distance, etc., remember I'm starting with very simple basics. All that will come later!)

On all these images I focused on the first shell. When I let the camera do the thinking, it decided that I wanted only one shell in focus and everything else blurry, so that's what it did. That's o.k. if that's what I really wanted. But what if I wanted to see more of the other shells?
I changed from Program to AV mode. I knew that if I chose a small aperture number, the back shells would still be blurry, so I picked a larger number and then the camera set the appropriate shutter speed to make a correct exposure. Hmmm, the shells are clearer and I like this better, but I was really hoping to see all the shells clearly. (As a side note, what do you notice about the shutter speed the camera selected?? It's pretty slow. I'd have to have a really steady hand to hold still long enough so the image wouldn't be blurry. Best option would be to use a tripod, which I did.)

Now I turned the aperture wheel to the largest number I could, to get the greatest depth of field I could. Remember the bigger the aperture number, the smaller the hole to allow light in. In order to get enough light through that small hole for a proper exposure, the shutter has to stay open a long time - a slow shutter speed. The shutter stays open so long, that I absolutely must use a tripod. Now this is what I envisioned when I set up this shot. Can you see that I couldn't achieve what I wanted if I'd just shot in Auto??
(For those pros out there who are worrying that I haven't talked about all the other factors that affect DOF such as what type of lens I was using, how close to the shells did I placed my camera, did I consider hyperfocal distance, etc., remember I'm starting with very simple basics. All that will come later!)
Here's two more photos to help you understand why a manual mode might work better for you:

Have you ever wondered why sometimes your pictures come out underexposed when you have it on the same Auto mode as when you took a previous shot and that shot was fine? This often happens when the majority of your composition is white or very bright, like a huge white wedding dress or a winter landscape filled with snow. The dress, the snow and everything else turns out looking dingy and underexposed. Here's a very brief explanation. Your camera on Auto mode is programmed to expose pictures to the value of 18% gray overall because percentage wise, most pictures have light, dark and medium light values that probably average out to 18% gray. This means that if your camera sees a bright white dress dominating the picture, it assumes the scene is overexposed and you really don't want that much bright white. So it reduces the exposure to compensate - and tadaaa, you get dingy gray instead of beautiful white.
 When you do the thinking, instead of letting your camera do the guessing, you will learn how to compensate for this problem by purposely overexposing your shot to come out with the exposure you were looking for. Incidentally the same thing is true for the opposite problem. If you wanted to take a picture of your cute black cat, sitting on a dark sofa, the camera on Auto mode would assume that your shot was underexposed, and would lighten it up. You then would have an 18% gray cat on a medium colored sofa!!
(Side note off the subject for you wedding photographers. If you have a really cluttered background and can't find a decent setting, and your bride has a really full dress, and you have a girl assistant to help you, use her dress as your backdrop. This has saved me many times, and the brides love it!)


(Side note off the subject for you wedding photographers. If you have a really cluttered background and can't find a decent setting, and your bride has a really full dress, and you have a girl assistant to help you, use her dress as your backdrop. This has saved me many times, and the brides love it!)
Here's another scenario. Your kids are playing and doing funny stuff. You want to remember the moment so you grab your camera and shoot.

First of all I have to say that those days really are just memories for me. Now I grab the camera for the grandkids. But for this post, I just went outside and snapped a shot of my son walking to the house. This is a definite 'hit the delete' photo.
 If I had a second to see that the Auto mode set a shutter speed too slow to freeze him walking, I could have quickly flipped to TV mode (shutter priority), and set a faster shutter speed and ended up with a reasonably sharp photo.


And finally, and most important to me, shooting in Manual allows you to be creative and end up with pretty pictures:

SOOTC (Straight Out Of The Camera) shot in Auto
The camera chose f/3.2 aperture and 1/50 shutter speed
This is not a very inspiring photo. The camera underexposed the shot, probably because I had my spot meter focused on the water. (I would have gotten a better exposure if I'd used evaluative metering. ) Even if this was properly exposed, it is destined for the garbage. But I have learned to better expose, but also to use my camera settings in manual to create a more interesting waterfall shot called veiling. This is a very common technique and easy to do.
 TV Mode - I choose a shutter speed of 1 second and the camera chose the aperture of f/13
The trick is to set a slow shutter speed to blur the water which creates a dreamy, cotton candy look. Of course you must use a tripod, and the scene must be dark enough to allow for a slow shutter speed. I took both of these shots yesterday in about 3 minutes. I hope the second one is good enough to be a visual argument about why you should at least try manual, AV, or TV modes. Scott mentions in his comment on the last post, and I concur, that in addition to shooting in the manual and semi manual modes, there are numerous other ways to manipulate how you use your camera to allow you the most creative options. The key is knowing what these options are, then choosing the method that is best to achieve the image you want to make. I can tell you that taking control of my camera, and showing it who's the boss (sometimes) has allowed me to do so much more with my photography and I've never turned back. I hope I've given you beginners some encouragement to take that leap and I'd love to hear how you are doing!
The camera chose f/3.2 aperture and 1/50 shutter speed
This is not a very inspiring photo. The camera underexposed the shot, probably because I had my spot meter focused on the water. (I would have gotten a better exposure if I'd used evaluative metering. ) Even if this was properly exposed, it is destined for the garbage. But I have learned to better expose, but also to use my camera settings in manual to create a more interesting waterfall shot called veiling. This is a very common technique and easy to do.

The trick is to set a slow shutter speed to blur the water which creates a dreamy, cotton candy look. Of course you must use a tripod, and the scene must be dark enough to allow for a slow shutter speed. I took both of these shots yesterday in about 3 minutes. I hope the second one is good enough to be a visual argument about why you should at least try manual, AV, or TV modes. Scott mentions in his comment on the last post, and I concur, that in addition to shooting in the manual and semi manual modes, there are numerous other ways to manipulate how you use your camera to allow you the most creative options. The key is knowing what these options are, then choosing the method that is best to achieve the image you want to make. I can tell you that taking control of my camera, and showing it who's the boss (sometimes) has allowed me to do so much more with my photography and I've never turned back. I hope I've given you beginners some encouragement to take that leap and I'd love to hear how you are doing!
P.S. I apologize to some of you who have made comments because they are not showing up on the blog. I have no idea what is wrong!!